

Many businesses are reporting that they have received a mailing from a
company called ID Certificate Service. It is a request form for a
2020 Certificate of Existence.
This mailing was not authorized by the office of the Idaho Secretary of State
nor is the business affiliated with the office of the Idaho Secretary of State.
This mailer can be deceptive and misleading. Please note that you are
NOT required by our office to purchase a certificate of existence.
Mailings Offer Unneeded Misleading Services


SOSBiz Frequently Asked Questions
![]()
Business Filings FAQs
Do I need an SOSBiz account?
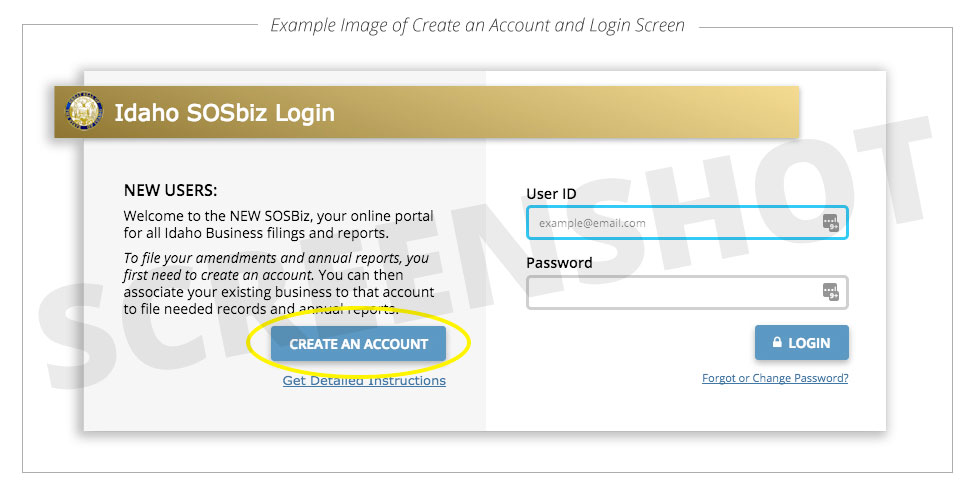
If you are a new user to SOSBiz, you must create an account to file any forms, reports or amendments with our office. Click Create an account, then login with the information you provided.
Are you unsure if you have created an SOSBiz account?
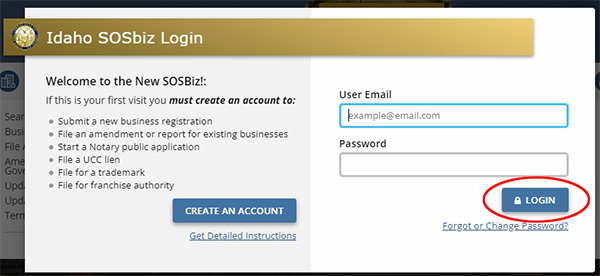
Please use your email address to log in to your account. If you need to recover your username or password, click here.
Do you need to update the email address on your SOSBiz account?
 Log In Using Your Account Credentials
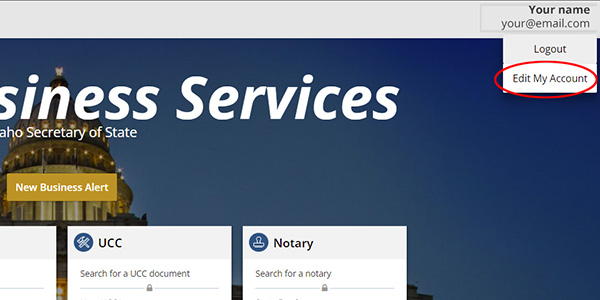
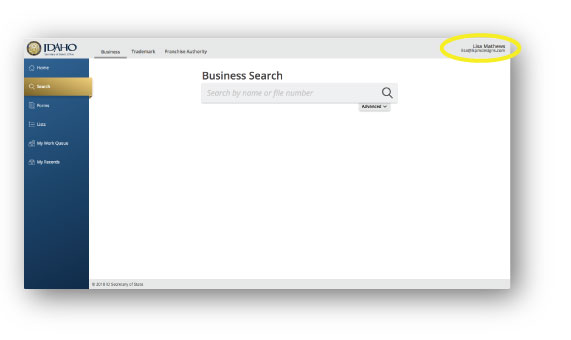
Once you are logged in you will see your name and email address in the top right corner of your browser window.
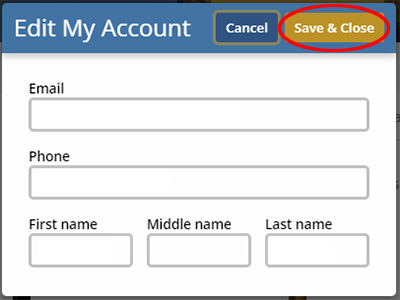
 Click on your account name and select “Edit My Account”
Your account name is at the top right of your browser window once you are logged in.
 Edit your email address or any other details and click “Save & Close”
You have the option to edit your email address, phone number, and name in this screen.
Do you need help navigating the SOSBiz website?
 Features Available Without Login
Home
The home page is the default webpage that will load when you visit the website. The home page includes links to frequently used functions. It may also include messages, such as planned down time, as needed.
Search
Click on the Search button to search for a business, contractor, notary, trademark, or miscellaneous (according to which tab is selected on the top of the portal form). A screen will appear with a search bar, you can search by name or file number. Advanced search features are accessed by clicking on Advanced and selecting the desired filters.
Once you have searched, click on the filing name to see additional details. A screen will appear on the right with information and actions that can be taken relative to that entity (based on your ‘ownership’ of the record and your login status).
Forms
Click on the ‘Forms’ button to select a form to create a new business filing. A screen with several different options will appear. You must create an account and login before you are allowed to file a document using these forms.
Choose from the tabs at the top of the page to select different types of records (Business, Notary, UCC, Trademark) to file.
Lists
This page holds compiled lists the state wishes to provide to the public. These lists are a reference resource to provide additional information to the registrants. Currently there are two lists for Idaho:
- List of commercial registered agents
- Recently appointed registered agents (last 14 days)
 Registered User Features
Once you have created an account in the portal and logged in, you will have additional features available in addition to the Public Portal features.
My Work Queue
The work queue allows you to review your submitted filing, make corrections to a saved draft, and download forms or receipts. Under the actions column there are four options:
- Make Payment (shopping cart icon) – select to continue the checkout and payment process
- View Filing – select to display the filing screen and saved data for the entity
- Delete – select to permanently remove this filing from the My Work Queue list
- Edit (pencil icon) – select to resume editing a saved draft of your filing
Document Status Options
- Drafts – incomplete filings; click on the icon to the right to continue editing.
- Pending Online Payment – filings that are pending completion and are waiting to be paid through the web portal. Click on the shopping cart icon to process the payment.
- Pending Print and Mail – filings that were completed with the ‘print and mail’ option and need to be signed and mailed to the Secretary of State’s office with payment and any required attachments for processing.
- Pending Review – filings that were completed and need to be reviewed and approved by the Secretary of State’s office.
- Correction – filings which the Secretary of State’s office have sent back for editing. There will be a correction letter available for you to read under the documents to download section. This correction letter will inform you as to what needs correction and how to update and resubmit the document.
- Rejected – filings that have been rejected by the Secretary of State’s office. The rejection letter is available for you under the documents to download section.
- Approved – filings that have been recently reviewed and approved.
My Records
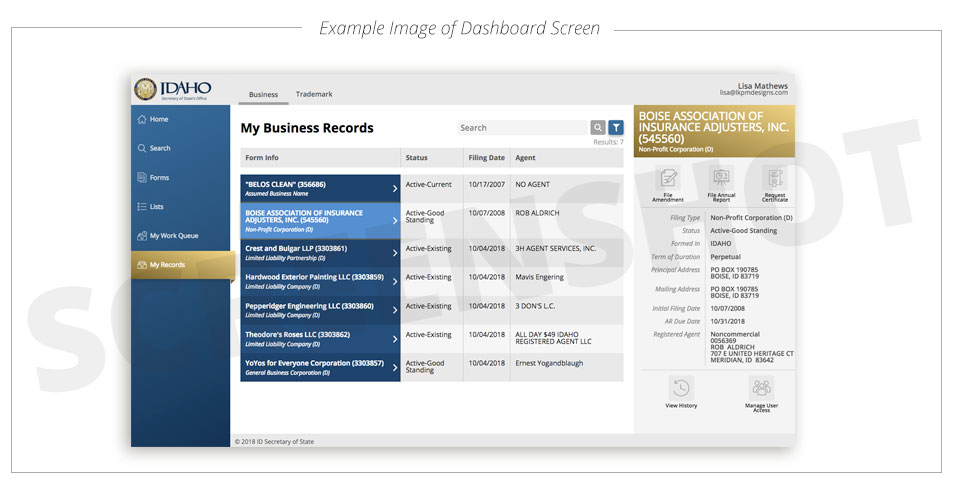
On the ‘My Records’ page, any records the registrant is assigned or has access to will appear here. In the form info column, the entity name and entity type are displayed. To the right is the file number, the current entity status, and the filing date.
Do you need explanations of form sections and their requirements?
Entity Name
We ask you to key the name twice to ensure it is EXACTLY as you want it in our records. This includes capitalization and punctuation. We don’t change what you type in, so make sure you enter it like you want it recorded.
When you key in the name, our system will do a preliminary check to see if the chosen name is available in Idaho. If the name passes the preliminary check, you will see a small green check to the right on the name on the first line. This doesn’t secure the name, it will be confirmed by our staff when submitted.
Finally, most names require a name designation. These are detailed in statute and in each wizard the description above the name entry box will list some of the name designation words which are appropriate for the filing type. The system will not let you proceed without an appropriate name designation if required.
Business Type
Some entities require information about the type of business being conducted. Select the most applicable item from the list if a selection is required. If the selection is optional, you have an option for ‘None’.
Effective Date
Most filings are effective when filed with our office (approved and paid). A few filings permit a delayed effective date. If you see this section in the filing, a delayed effective date is permitted for the filing. Select if you want the filing to be effective when filed, or at a later date (within 90 days of the filing date).
Address Blocks
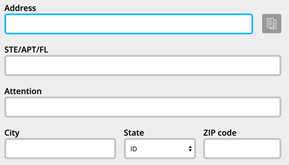
Our system is integrated with the USPS dress validation system. We require that the mailing address provided be a valid address within the USPS database to ensure we can deliver important notices to your entity by mail.
Due to the large number of rural street addresses in Idaho which are not included in the USPS database, we are not validating the street address, so be sure to double check your entry for accuracy. We do require that a full address be entered.
Copy Addresses
Often the same address is used several times in a filing. Once an address has been entered in the filing once, you will see an icon just right of the address box (it looks like two sheets of paper stacked) – clicking on this icon will display all addresses previously entered in this filing. Select the appropriate address and the system will populate the address block for you.
Commercial Registered Agent Selection
If your entity uses a commercial registered agent (see list on the list tab in the portal); select the Commercial button to add or change your commercial agent.
Use the search feature to locate your desired agent. If you key in the first word or two of the agent name in the search field, the list returned will be much shorter. Select the agent and the system will display the agent’s name and addresses.
If the address for the agent is incorrect, contact your agent. Only the commercial agent is permitted to update their address of record.

Discuss Your Filing With Your Agent
Some agents may want you to select the ‘print & mail’ filing option so you can forward the document(s) to them for submission.
Noncommercial or Individual Agent
If you are NOT using a commercial agent, select the noncommercial option. The system will expose an option to ‘Add New Agent’ at the bottom of the form.
Entity Represents Self with a Governor
If the entity plans to represent itself with one of the governors serving as agent, select to ‘add new agent’, select the individual button, and key in the name of the individual acting as agent.
Governors
Depending on the requirements of the specific entity type, you will be asked to list the governors – officers/directors/partners/members/managers/etc.
Use the ‘Add’ button to enter the first name and address. If each governor has a unique address, continue using the ‘Add’ button to enter each one. If several governors use the same address, use the copy button on the right side of the first listed governor to copy the row. Then click on the name to edit.

Declarations
Each filing has specific declarations which must be read and agreed prior to submitting the filing for approval. Read each item, and if agreed, check the box to the left of the statement.

Signature Block
Each filing must be signed by an authorized individual prior to submission. If you are filing online, the document may be signed electronically (type in your full name) by an authorized preparer.
If you print & mail the filing to our office, make sure the filing is signed or we will have to return it for signature. This will delay your filing.
Date the signature with today’s date. You cannot submit a past or future date of signature.
If requested. Enter the title or capacity of the signer. This is a text field in which any appropriate title can be typed.

File Document
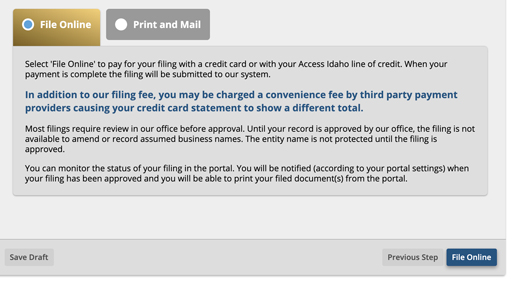
There are two options for filing – online or print & mail. Online filings incur a small convenience fee which is paid to the payment processor. Print & mail documents can be paid by check and do not incur a convenience fee. Select the desired option.
If a document requires more than one signature, there will not be an option to file online.
Online Filing
To file online you will need to pay (if the filing requires a fee) through our payment processor’s secure payment system which will open automatically when you select to file online. Our payment process is Access Idaho. You may pay them using a credit/debit card or using an Access Idaho Line of Credit account (which must be established in advance and requires a separate login).
Print & Mail
If you do not wish to pay online, you may print and mail your filing with payment in the form of a check or money order. Please DO NOT SEND CASH IN THE MAIL. When submitting your filing by mail, double check that any required attachments are included, the document is signed, and a signed and dated check/Money Order made payable to ‘Secretary of State’ is enclosed.
Do you need help finding and associating your existing business?
 Log In Using Your Account Credentials
You will know that you are logged in because you will see your name and email address in the top right corner of your browser window as shown in the example.
 Search for Your Business and Select Its Name
When you click on the business name all the information on file with our office will pop out from the right side of the screen.
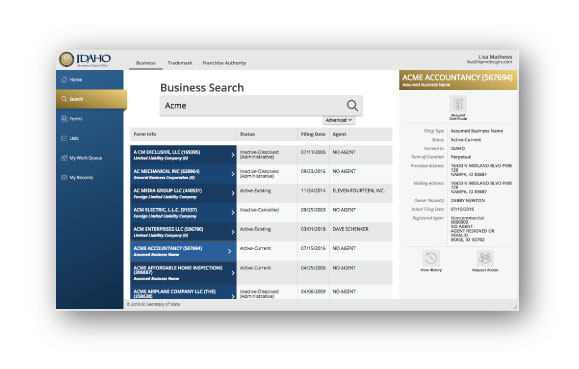
 Request Access via PIN Verification Process
On the lower right portion of the pop out window you will see an icon that looks like three people together that says “Request Access”. When you click this icon a button will appear that says “Request PIN”. Click this button which will email a PIN number to your account email address.
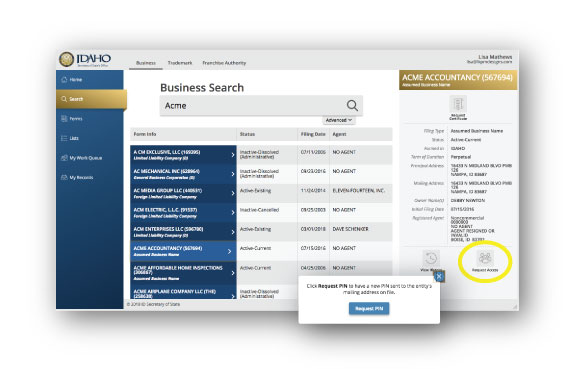
 Enter PIN and Associate Company to Your Account
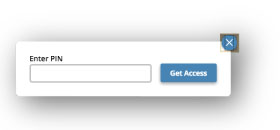
Check your email to retrieve the PIN. You should receive it within 5 minutes of requesting it from this system. Copy the PIN from your email and come back to the “Request Access” icon on the pop out window, which will now say “Enter PIN’. Enter the PIN and click ”Get Access”.
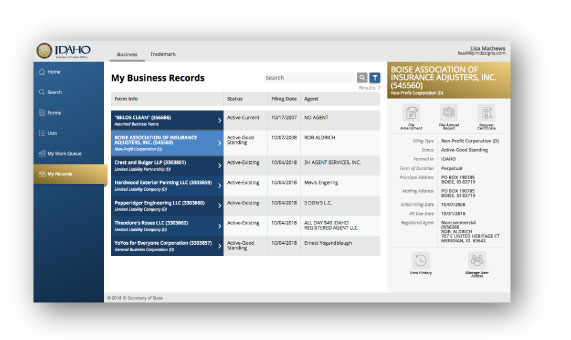
 Access Your Company Through Your Dashboard.
Now you have successfully associated your company to your account. You may repeat this process with as many companies as you have need for. Any time you log in you can access these by clicking on “My Records” in the left navigation.
Do you need help filing an annual report or an amendment?
 Log In Using Your Account Credentials
You will know that you are logged in because you will see your name and email address in the top right corner of your browser window as shown in the example.

 Access Your Company Through your Dashboard
In the left navigation menu click on “My Records” and click on your company name that appears in the main work window. If you do not see your business, or any businesses, under this menu item you need to go back to the previous help topic to associate your business to your account.

 Review Reports and Amendments Available for Filing
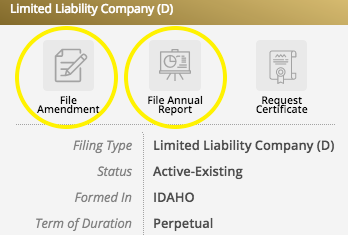
Filing amendments and reports are done very similarly in our system. In this example we will be filing an ANNUAL REPORT. Select the “Annual Report” icon under the business name in the pop out window on the right side of the screen.
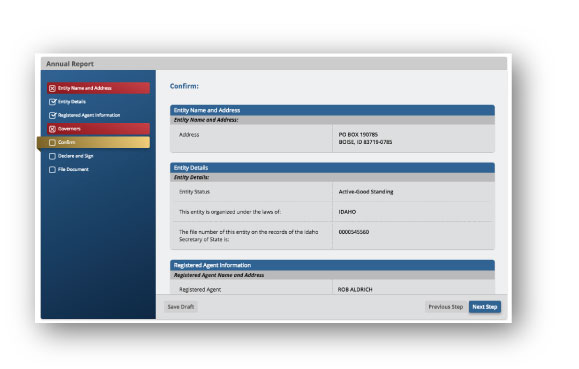
 Verify Information and Move Through Report Fields
The Annual Report is a simple verification process to confirm entity details. Follow each step to verify these details. In each step the system will prompt you to go back if you are missing steps by flagging the step with a red check box as pictured in the example. Correct any errors and continue until you can confirm each step.
 Declare, Sign and File Your Document Online
Once you have completed your document each step will be confirmed with a checkmark. You may then complete the filing by signing and filing.
Do you need help uploading or attaching documents to your filings?
 Is An Additional Document Required with Your Filing?
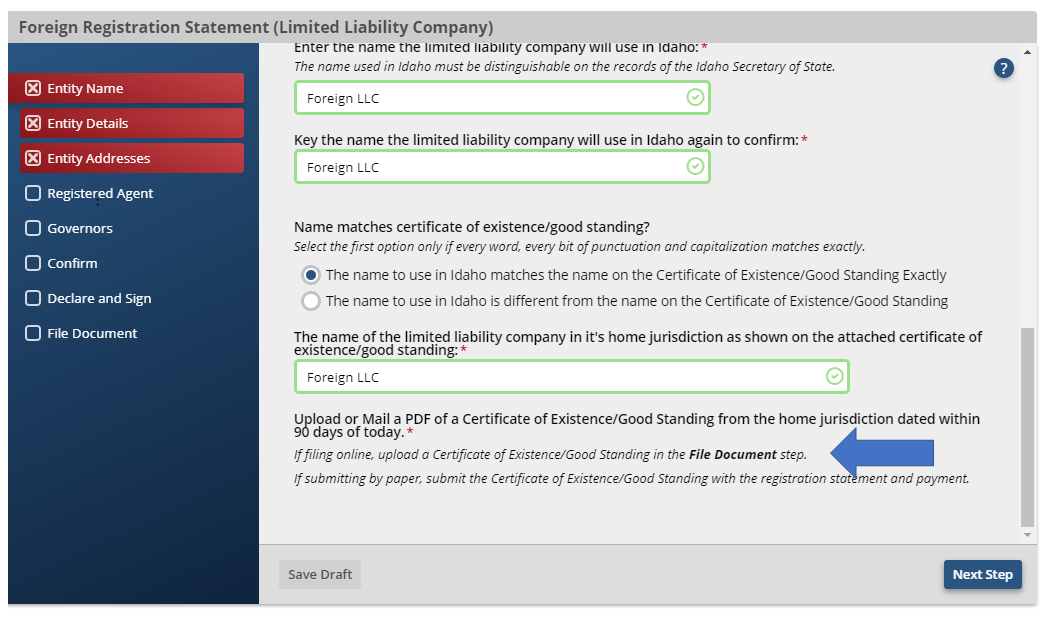
Some filings require you to upload additional documents along with your filing. If an uploaded document is required, the requirement will be indicated with a note similar to that pictured below (see the blue arrow):
 Upload Your Document During the File Online Step
During the “File Online” step of your filing you will have an upload field available to upload any additional documents required for the filing. Simply click the box indicated by the dotted blue border (see blue arrow below) and locate the file on your computer to upload.
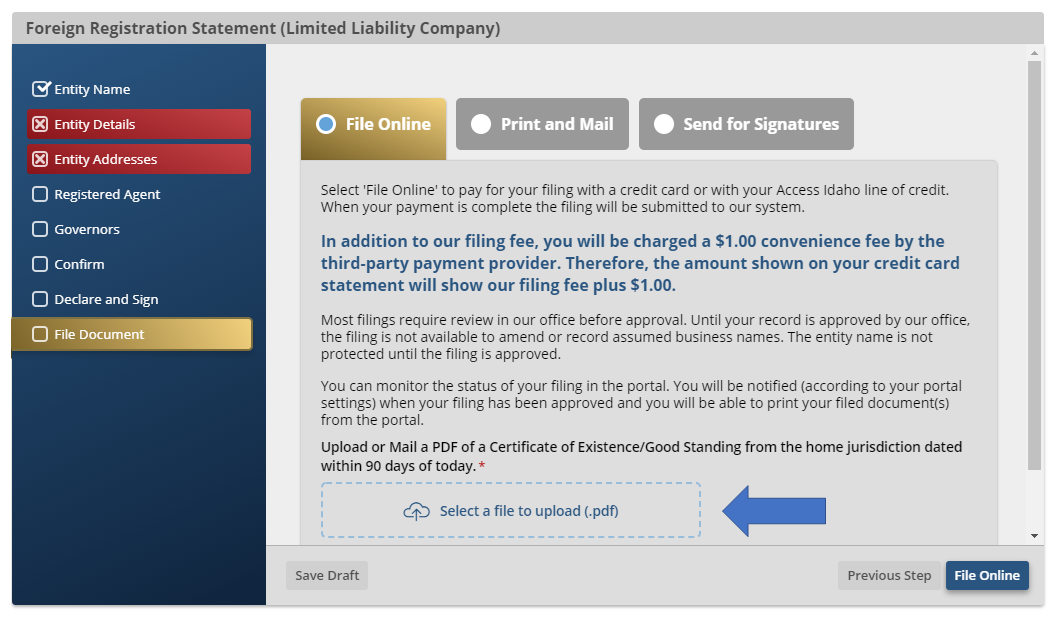
Once the document is uploaded, you may complete your filing online.
Does our website look strange or appear incorrect to you?
Our website is optimized to be used on a Google Chrome browser. You can use your preferred browser, but other browsers may not provide an ideal experience.
Do you need access to paper forms?
Anyone who uses a printed form must use one of the new forms (with a barcode) or your filing will be rejected.
You may request a blank form by contacting our office in person, by emailing [email protected] or by phone at (208) 334-2301, or you may download them by clicking here.
Filing a paper form will typically incur an additional $20 manual processing fee, and forms submitted without this additional fee will be rejected. If you would like to avoid the additional manual processing fee, file forms online by clicking here.
When submitting paper filings, please plan for additional processing time. You will need to mail or hand deliver your completed form to the SOS Business Services office located at 450 N. 4th Street, Boise, Idaho 83702, and include a check for the cost of the appropriate filing fee plus an additional $20 for the paper filing fee.
Still have a question that hasn’t been answered?
Click here for our continued list of FAQ’s.
Notary FAQs
Do you need help creating an account or logging in?
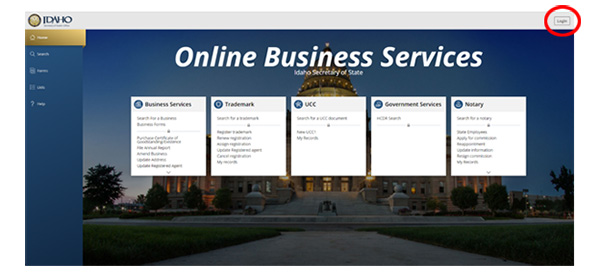
1. Click Log In in the top right.
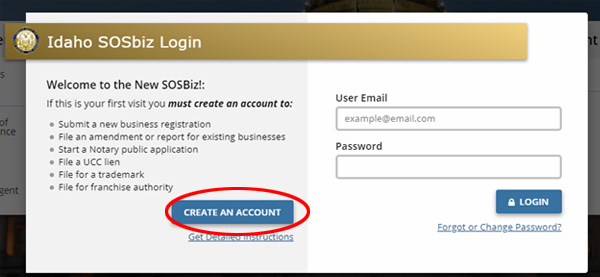
2. Click Create An Account.
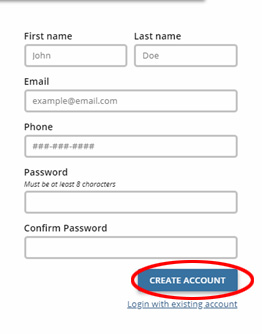
3. Fill out each section and click Create Account.
If you receive this error, repeat step 1 and click Log In.
Then click Forgot or Change Password?

Follow the prompt and enter the email that already exists. A link will be sent to that email allowing you to create a new password.
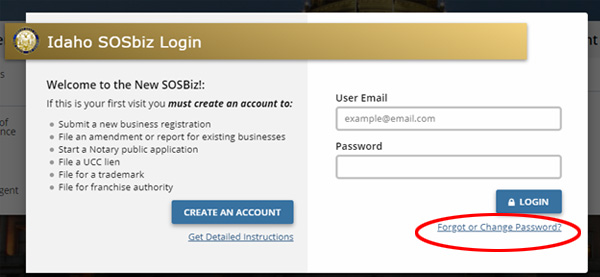
Do you need help starting your application?
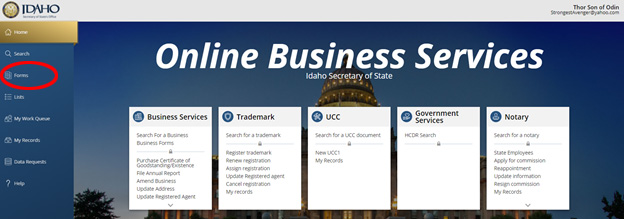
Once you’re logged in, click Forms in the blue navigation column to the left.
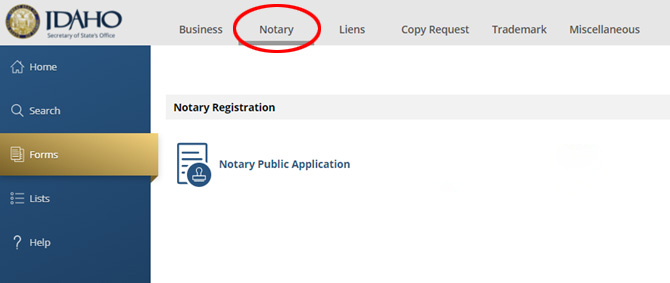
Click Notary in the grey section at the top.
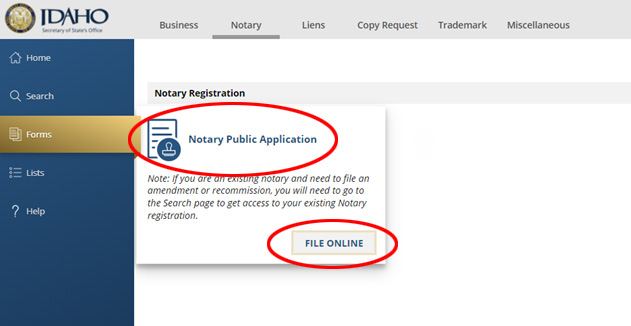
Click Notary Public Application and File Online.
Do you need help updating your notary information, reappointing your commission, or adding technology?
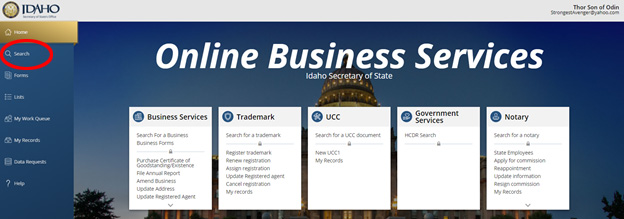
Once you’re logged in, click Search in the blue navigation column to the left.
Click Notary at the top in the grey section to complete a Notary Search.

Search the commission number or exact notary name then click the name in blue.
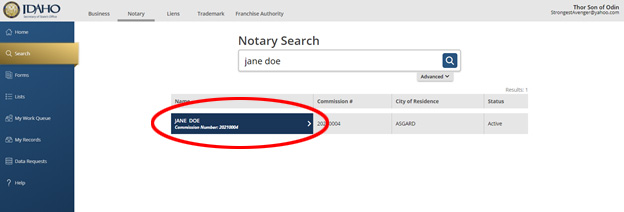
Click the Request Access icon that slides out to the right.

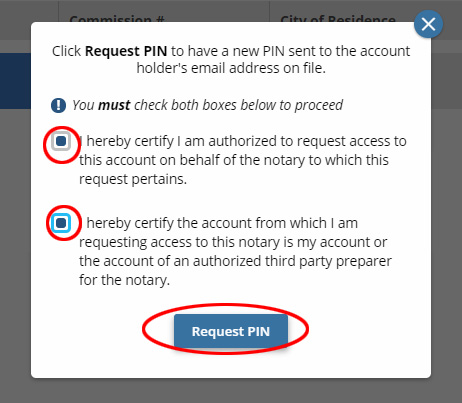
Follow the prompt, click the two boxes, and Request PIN to have a PIN sent to the email you’re logged in with.
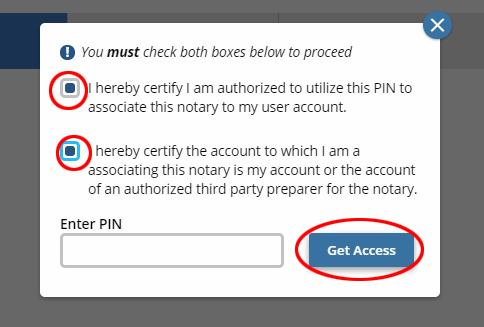
Once you receive that PIN, return to the Request Access icon to enter the PIN to gain access.
*Note: PIN is case sensitive*
Once you have gained access, click My Records in the blue navigation column to the left.
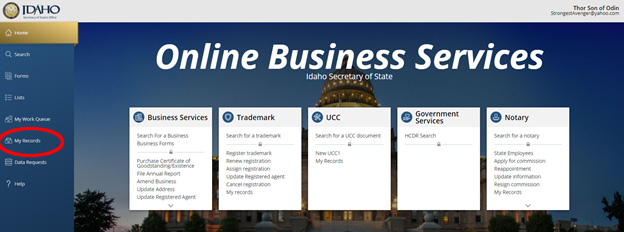
Click Notary at the top in the grey section.
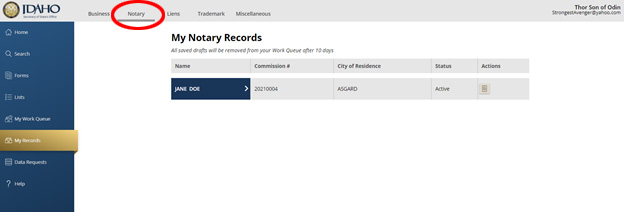
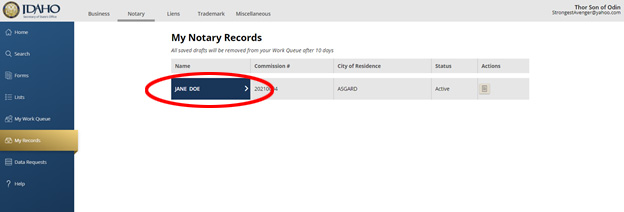
Click the name in blue.
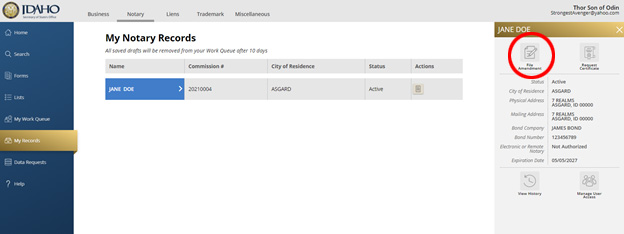
Click the File Amendment icon that slides out on the right.
Simply click whichever amendment you would like to complete.
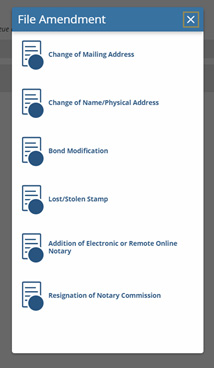
If you would like to reappoint your commission, click File Reappointment
*Note: This option is only available within 90 days of the expiration date.
If you would like to add technology, click Addition of Electronic or Remote Online Notary.
UCC & Liens FAQs
Do I need a SOSBiz account to file a lien or a UCC?
Yes, all users must create an account. Creating an account and logging in each time you visit SOSBiz will help you save time, prevent errors, pay less in fees, and your filings will be completed and accepted much faster.
How do I amend a UCC or release a lien?
Visit the UCC/Liens Search page of SOSBiz and log in to your account. Use the search function to locate the lien or UCC you need to amend. Once you find and open the lien document, you will see the amendment icon at the top of the screen.
I work for a state agency, but I don’t see where I should log in as an exempt user.
Please create a SOSBiz account and log in. When checking out, select the Access Idaho subscription account payment option. They will automatically waive your fees.
I work for a county agency, and I should be exempt from filing fees.
Create your SOSBiz account and then email us your username and county name at [email protected] to establish your exempt status. We will confirm your account is exempt via email, and you will be able to file liens at no charge.
I don’t have access to a computer or reliable internet and can’t file online. How do I file?
Anyone who uses a printed form MUST use one of the new forms (with a barcode) or your filing will be rejected. Our new forms can be found online on our UCC Forms page. You may also request a blank form by contacting our office in person, by emailing [email protected], or by phone at (208) 334-3191.
You will need to mail or hand deliver your completed form, along with the appropriate filing fee, to the SOS Business Services office located at 450 N. 4th Street, Boise, Idaho 83702.
